
Android Workshop Part 3: A List of TODOs
At these are app is set up and looking beautiful, so let’s make it do something. We are going to start by adding in a list, and setting up a TODO object.
Step 1: Defining the scope
One of the most important things about software development in defining the scope of what it is going are going to be making. This helps you to decide when you are ‘Done’, or when the product is releasable, it also helps keep your motivation up, knowing that there is a goal. Many projects are never completed because of a failure to define what the project actually is. I like to call the result of this initial ideation the Minimum Viable Product (MVP). This is the minimum feature set the product must have in order to be released to users. Below we define our MVP:
- Show a TODO
- Add a TODO
- Remove a TODO
Step 2: Set up the Layout
In the content_main.xml file within the res > layout folder, this is the file that folds the view components
within the main area of the screen (the big white area). You’ll see that it currently defines the ‘Hello
World’ TextView. We want this view to hold a list of TODOs, so lets delete the TextView by removing the following code:
<TextView android:text="Hello World!"
    android:layout_width="wrap_content"
    android:layout_height="wrap_content"/>
So now we are left with just a layout, but what we want is a list of items. Android has a built in
ListView for exactly this purpose. In the same file change the RelativeLayout tag to ListView, the
properties of the tag can stay the same.
You now how a layout file with a single ListView element. We want to be able to use this element in our Java code,
for that we need to give it an id. Underneath the line:
android:layout_height="match_parent"add the following line, to declare an id for the list element:
android:id="@+id/todoListView"Our layout is now set up, so let’s do some Java!
Step 3: Show a TODO
- Open
MainActivity.javafrom the java > com.thoughtworks.workshop.myandroidapp directory. This is an Android Activity class.
Activities
An Activity is a window on the screen, it normally occupies the entire screen. It always has a root view, known as
the content view, and that view may contain many other views, such as a TextView, Navbar or Buttons. Activity
are incredibly important to an Android application, each screen or flow of screens is normally as activity, they
separate logic and functionality and hook into the lifecycle of the application. Activities are very clever, and if
written correctly, should always know how to recreate themselves in case the device runs out of memory and has to
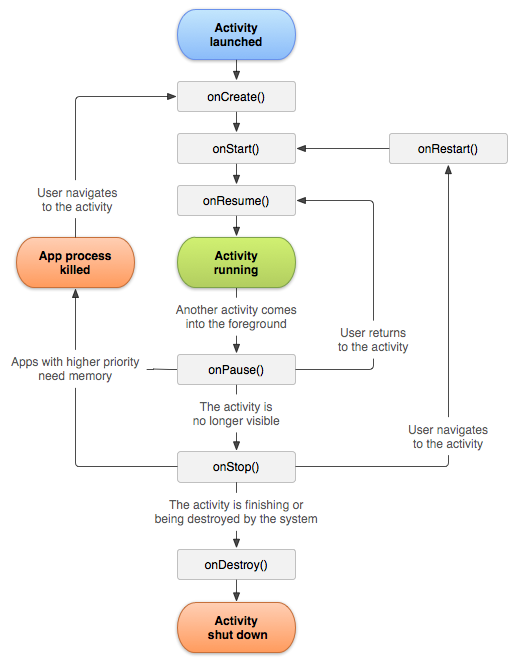
destroy it. The diagram below shows the Activity Lifecycle, the methods detailed are the methods in which you
should use to manage your screen. Avoid using constructors or static state, as this can be lost.
For more information about how android applications are structured take a look here. For more information on what each of the lifecycle methods are for, check this out.
Removing the Cruft
You’ll notice that MainActivity contains some code already, two of these generated methods we do not need, so let’s
delete them. Remove the methods onCreateOptionsMenu and onOptionsItemSelected, these methods are used for
creating the settings menu in the TabBar, which we will not require.
Showing a List Item
So now we are left with just the onCreate method, you can see that the generated code is setting up a Layout,
TabBar and a FAB. For now we will ignore this code, and come back to it later.
In order to add an item to the ListView we need to get a reference to the listView in the layout file, using it’s
id and set it’s ListViewAdapter. The ListViewAdapter controls the data for the list, it is used to
determine how many items are in it, where each one is and what they look like. Android has a number of build in
adapters, with default implementations, we can utilise and extend these to fit our needs. We will be using
ArrayAdapter which is an adapter build to manage an array or list. Exactly what we need. The only
issue here is that we want a list of checkboxes, which isn’t a default implementation, so we will want to make our
own layout file in the res > layouts folder, and use that as shown below:
MainActivity.java
public class MainActivity extends AppCompatActivity {

    private TodoAdapter adapter;

    @Override
    protected void onCreate(Bundle savedInstanceState) {
        super.onCreate(savedInstanceState);
        //Setting the context view, from the activity_main.xml file
        setContentView(R.layout.activity_main);

        //Setting up the toolbar
        Toolbar toolbar = (Toolbar) findViewById(R.id.toolbar);
        setSupportActionBar(toolbar);

        //Setting up the FAB
        FloatingActionButton fab = (FloatingActionButton) findViewById(R.id.fab);
        fab.setOnClickListener(new View.OnClickListener() {
            @Override
            public void onClick(View view) {
                //When the FAB is tapped we will execute any code in here
            }
        });

        //Grab the ListView from the xml layout using it's ID
        ListView todoList = (ListView) findViewById(R.id.todoListView);

        /*
         * Create our adapter, we want to keep a reference to this
         * by making it a field, so that we can use it later
        */
        adapter = new TodoAdapter(this);

        //Assign the adapter to the ListView
        todoList.setAdapter(adapter);

        //Add some example items
        adapter.add("Bread");
        adapter.add("Eggs");
    }

    /**
    * Our custom adapter, designed to show manage a list of stings,
    * and show them using the layout defined in todo_list_item.xml
    */
    private class TodoAdapter extends ArrayAdapter< String > {

        public TodoAdapter(Context context) {
            //Tell ArrayAdapter about the activity, the layout and the list of items
            super(context, R.layout.todo_list_item, new ArrayList<>());
        }

        /**
        * This is called when we want to show an item in the list, the position of the item is given
        * so that we can find the item in the last and configure the layout to present it
        */
        @Override
        public View getView(int position, View convertView, ViewGroup parent) {
            /*
            * Once created list item views are re-used in order to increase efficiency in large lists.
            * If the current view is a new view and not a re-used one we want to inflate it
            */
            if (convertView == null) {
                convertView = LayoutInflater.from(getContext())
                    .inflate(R.layout.todo_list_item, parent, false);
            }

            //Get the checkbox element from the view using it's ID
            CheckBox todoCheckbox = (CheckBox) convertView.findViewById(R.id.todoCheckbox);

            //Find the item in the list, this method is built in to ArrayAdapter
            String todo = getItem(position);

            //Set the checkbox text to be the item we just found
            todoCheckbox.setText(todo);

            //Return our fully set up view
            return convertView;
        }
    }
}
todo_list_item.xml
<LinearLayout xmlns:android="http://schemas.android.com/apk/res/android"
              android:layout_width="fill_parent"
              android:layout_height="wrap_content"
              android:orientation="horizontal">
    <CheckBox
            android:id="@+id/todoCheckbox"
            android:layout_width="wrap_content"
            android:layout_height="wrap_content"
            />
</LinearLayout>
If you run this now it should look something like this:
 So we now have some example items in our list, let’s enable the add button.
Step 4: Add a TODO
For this we want to utilise the following piece of code that we already have:
//Setting up the FAB
FloatingActionButton fab = (FloatingActionButton) findViewById(R.id.fab);
fab.setOnClickListener(new View.OnClickListener() {
@Override
public void onClick(View view) {
//When the FAB is tapped we will execute any code in here
}
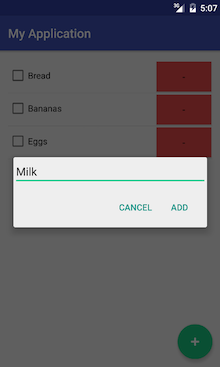
});This code defines what happens when the user clicks the FAB, currently nothing. For now, we want clicking on the FAB to open a dialog, in which the user can enter their new todo. Something like this:

There are many different dialogs built into Android, and you can always
make your own if you want a more interesting layout for now, let’s use a build in one. In MainActivity create the following method:
//Setting up the FAB
private AlertDialog createAddTodoDialog() {
    AlertDialog.Builder builder = new AlertDialog.Builder(this);

    //An EditText is like a text field, it's a view which allows the user to edit some text
    final EditText editText = new EditText(this);

    //Set the main view of the dialog to be the EditText
    builder.setView(editText);

    //Set the text for the buttons and their actions
    builder.setPositiveButton("Add", new DialogInterface.OnClickListener() {
            public void onClick(DialogInterface dialog, int id) {
                /*
                 * When add is clicked we add the user entered text
                 * to the list that the adapter is managing
                 */
                adapter.add(editText.getText().toString());
            }
        });

    /*
     * We don't want to do anything when the user selects cancel,
     * so we just pass null as the onClickListener
     */
    builder.setNegativeButton("Cancel", null);

    //Return the created AlertDialog
    return builder.create();
}
Inside the FAB’s onClick method add the following lines:
AlertDialog dialog = createAddTodoDialog();
dialog.show();
If you run the app again now you should be able to add new items to the list using the FAB.
Step 5: Delete a TODO
Now we can show and add TODOs, and implicitly check them off. We want to be able to remove them.
There are many interaction patterns that could be used to do this, for example swipe or long press.
You now we are going to take a reasonable simple option and add a delete button to each of the list items.
To do this, we will need to add the button the layout, style it, and in MainActivity
we want to find the button using it’s id.
todo_list_item.xml
<LinearLayout xmlns:android="http://schemas.android.com/apk/res/android"
              android:layout_width="fill_parent"
              android:layout_height="wrap_content"
              android:orientation="horizontal">
    <CheckBox
            android:id="@+id/todoCheckbox"
            android:layout_width="wrap_content"
            android:layout_height="wrap_content"
            android:layout_weight="1" />

    <Button
            android:layout_width="wrap_content"
            android:layout_height="wrap_content"
            android:text="-"
            android:id="@+id/deleteButton"
            android:layout_weight="0"
            android:layout_margin="2dp"
            android:background="#e44949" />

</LinearLayout>
Here we create a delete button, I’ve set it’s text to the minus character and coloured it red, but you could use a word,
or an icon if you would like. It’s id is set to deleteButton. In MainActivity replace the TodoAdapter with
the code below.
/**
* This is called when we want to show an item in the list, the position of the item is given
* so that we can find the item in the last and configure the layout to present it
*/
@Override
public View getView(int position, View convertView, ViewGroup parent) {
    /*
    * Once created list item views are re-used in order to increase efficiency in large lists.
    * If the current view is a new view and not a re-used one we want to inflate it
    */
    if (convertView == null) {
        convertView = LayoutInflater.from(getContext())
        .inflate(R.layout.todo_list_item, parent, false);
    }

    //Get the checkbox element from the view using it's ID
    CheckBox todoCheckbox = (CheckBox) convertView.findViewById(R.id.todoCheckbox);

    /*
    * Find the item in the list, this method is built in to ArrayAdapter
    * This must be final as it is used in an anonymous class.
    */
    final String todo = getItem(position);

    //Find the delete button in the view
    Button deleteButton = (Button) convertView.findViewById(R.id.deleteButton);

    //Define what happens when it is clicked
    deleteButton.setOnClickListener(new View.OnClickListener() {
        @Override
        public void onClick(View v) {
            //Remove the current to do from the list
            remove(todo);
        }
    });

    //Set the checkbox text to be the item we just found
    todoCheckbox.setText(todo);

    //Return our fully set up view
    return convertView;
}
We have changed the signature of TodoAdapter, to include a passed in List we want to change the line that creates
the adapter to following:
adapter = new TodoAdapter(this, new ArrayList< String>());If you run the app now you should see something that looks like the screenshot below, and you should be able to add, remove and check items in the list.
Step 6: Extensions
Below is a list of possible extensions to this project:
- (Novice) Style the delete button, or switch it to a slider, as it is currently quite ugly. Try using icons from here
- (Novice) Remove the FAB and inline the addition of items, for a better user experience
- (Moderate) Store the TODOs using SharedPreferences
- (Advanced) Store the TODOs using SQLite
- (Advanced) Allow the addition of multiple TODO lists, using Fragments