
Android Workshop Part 1: Setting up
The instructions laid out below are for setting up your computer to work with Android. This includes configuring Android Studio (the IDE), and setting up a test device.
Step 1: Installing Java
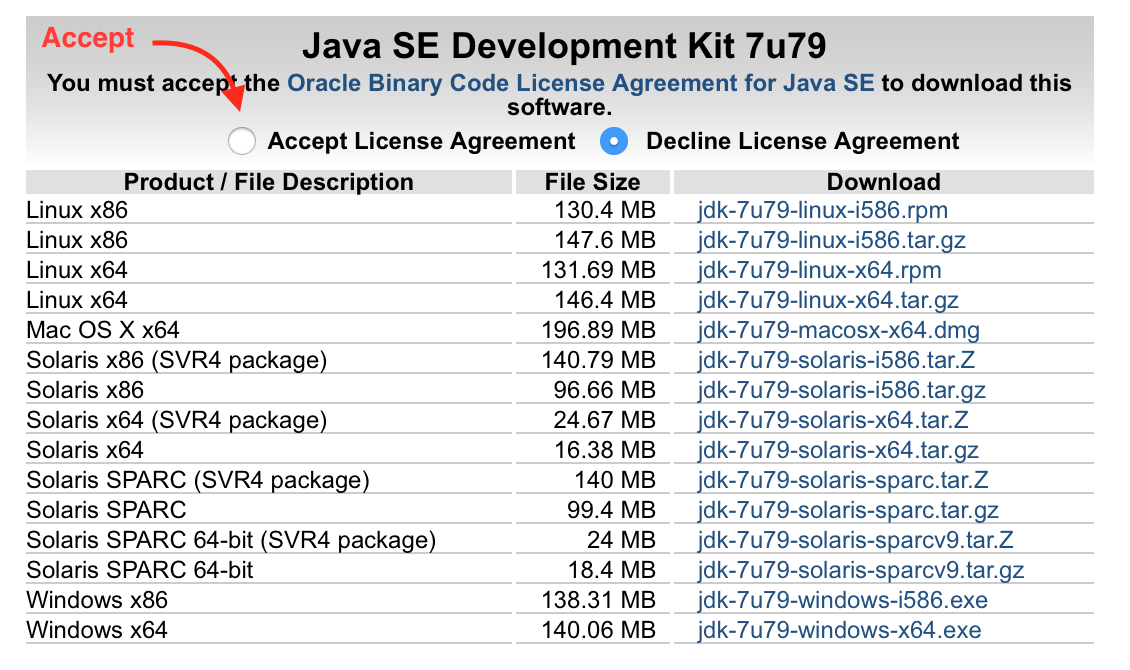
Android applications are written in the Java programming language. Because of this you will need to install the Java SE Development Kit (JDK). Go the web page and download the right version for your operating system. Make sure you accept the license agreement.
If running Windows you can find out if your machine is 64 bit (x64) or 32 bit (x86) here
Step 2: Setting up your environment
- Install and start Android Studio.
- When the application starts a window titled ‘Android Studio Setup Wizard’ will open, select next.
- Choose the standard installation
- If a pop up appears saying ‘Complete Installation’ please select ‘I do not have a previous version of Studio’
- Select ‘Finish’, this will take around 10 minutes to install depending on your internet connection and you may need to enter your administrator password
- When the installation is complete select ‘Finish’
You should now have android studio installed and running on your machine.
Step 3: Setting up your first application
- In the menu select ‘Start a new Android Studio Project’
- In the application details form enter the application name ‘MyAndroidApp’
- Enter the company name:
com.thoughtworks.workshop - On the next screen in the minimum SDK dropdown, select Phone and Tablet API 19 Android 4.4 (KitKat)
- On the next screen select ‘Blank Activity’
- On the next screen leave the settings as the defaults and select ‘Finish’. This may take a second
You are now ready to run your first Android app!
Step 4: Setup a Device
At these point you are able to run the application, either on a real device or on an emulator. If you have a real android device, running Android 4.4 or above then follow the setup your phone instructions, otherwise follow the setup an emulator instructions.
Setup your phone
- Enable developer mode by going into Settings > About Phone and tapping on the ‘Build Number’ 7 times. A toast should appear informing you that you are now a developer
- Go back into settings and select the new ‘Developer Options’ menu item
- In the developer options enable ‘Use Debugging’ and ‘Untrusted Sources’
- Plug in your device, via USB to your computer
- When a pop up appears on the phone asking you to trust the computer, select trust, or trust always
Setup an emulator
- Open Android Studio
- Select the ‘AVD Manager’ from the top bar. A window titled ‘Your Virtual Devices’ will open
- Select ‘Create Virtual Device’
- Select the ‘Nexus 5’ from the list of phones and click ‘Next’
- Select Lollipop (API level 22, ABI x86_64) as the system image and click ‘Install’
- Once that’s complete, click ’Next’
- On the next page, leave the default settings and select ‘Finish’. You will now see the device in the list of devices
- Double click on the newly created Nexus 5 device. A window that looks like an android phone will open and the emulator will start up. You’ll know it’s ready when you see the phone’s lock screen. Leave the emulator open
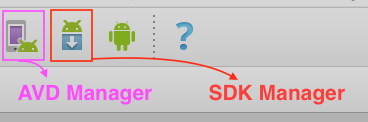
The android tools in the Android studio toolbar
Step 5: Run the Application
- In Android Studio, select the ‘SDK Manager’ from the top bar.
- In the window that opens select the ‘SDK Tools’ tab, check the ‘Android Support Library’ option and click ‘Ok’
- In the dialog, click ’Ok’ and then ‘Finish’
- In Android Studio, click the Play button in the top menu
- If you are asked to select a device, select either your phone or the emulator we created and click ‘Ok’, this may take a minute
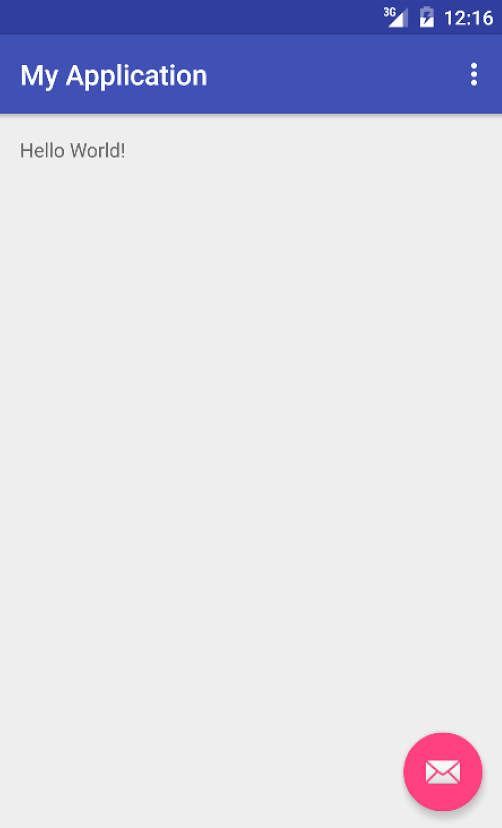
Your application should now be running on your device!
For the event, if you are using a real Android device, don’t forget your USB cable for your phone.